Posts

Easy DIY Mini Shelf For Dolls

Image
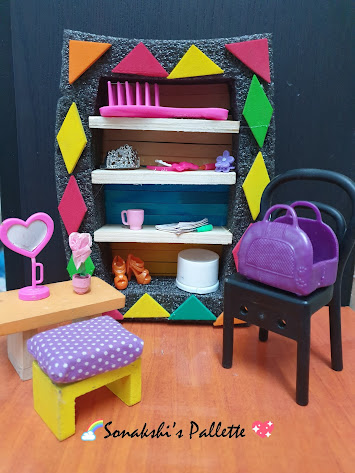
This is the mini shelf for dolls. To make it you need-   1. Cardboard or styrofoam 2. Wooden plates 3. Hot glue or Allfix 4. Ice-cream sticks.   First put glue on the edge of the wooden plates.   Stick it on the cardboard or styrofoam.  Do the same with the other wooden plates as i have shown in the picture. Flip it on the other side and add the ice-cream sticks horizontally as shown in the picture.    You can chose your own patterns of coloured ice-cream sticks or you can use plain sticks to paint it later if you want to. It will look like this on the front side. Add stickers to decorate it. And your shelf is ready!!   Now you can put anything that belongs to your dolls! (miniatures only) I have used the styrofoam  in packages that come to our houses online. If you have some you can  too use it to make your mini shelf. And if you don't  then use cardboard 3 layers if you have thin cardboard and use only one layer if you have fat layers that come separately in online packages but

DIY Tea light holder ( Diwali deoration )

Image
 Hi everyone!!!!! Today i am going to show you how to make tea light holder they look like this  things needed are: 1) glitter paper  2)sticker beeds 3) fevicrily glue 4) candle holder 5) and a candle 6) a bowl  7) sissors   take the glitter paper  and the bowl. Put the paper up side down and the bowl also up side down for tracing the circle. After tracing the circle cut the circle on the outline. Now take the candle holder put glue on it and glue it on the middle of the circle. But you are not done yet remember those beeds put them on in your way without decoration anything does not look nice. And your Tea Light holder is ready!

Glittering Rainbow

Image
Hi everyone!!! I made a poem The Glittering Rainbow. I made it all by myself   "Glittering rainbow       up in the sky, colourful, beautiful     a lovely site, we get to see it only     when it rains, and through the clouds,     the sun peeps high"   see this is the poem i made do you like it?  If you do comment below Sonakshi   And also visit Sonal's Pallette

DIY - Easy 2 minute Paper Plate Scenery Craft for Kids

Image
    Hi! My name is Sonakshi. Today I am going to show you how to make DIY 2 minute Paper Plate Scenery craft for kids. Things needed are    1. Paper plate - Medium size 1 plate 2. Some colourful craft paper 3.Scissors 4. Glue 5. Marker or sketchpen  6. Pencil First take the craft paper and the pencil and also the paper plate.Then turn plate up side down and put it on the paper. Now trace like shown in the picture. After you have traced it with the pencil cut it on the pencil line. Put glue on the edges and stick it on the plate and let the glue dry. And do the same with the next paper. Just like in the above picture And its the same step. Cut it on the pencil line like shown in the above picture Now put glue on the edges like the previous paper and stick it on the plate.   Let's take another paper the scissor. Then cut out small squares. Then fold it like shown in the picture and make a curve on the top and cut where you drew the curve. now you get a flower. Take the flower and put